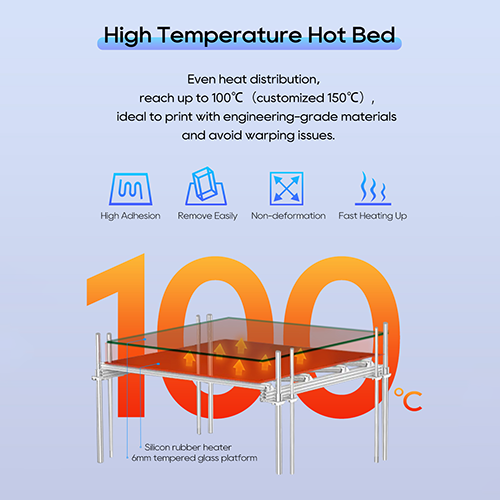
 EN
EN
 AR
AR
 BG
BG
 HR
HR
 DA
DA
 NL
NL
 FR
FR
 DE
DE
 EL
EL
 HI
HI
 IT
IT
 JA
JA
 KO
KO
 PT
PT
 RU
RU
 ES
ES
 SV
SV
 TL
TL
 ID
ID
 SR
SR
 SK
SK
 UK
UK
 VI
VI
 ET
ET
 HU
HU
 TH
TH
 TR
TR
 MS
MS
 GA
GA
 BE
BE
 HY
HY
 KA
KA
 LO
LO
 LA
LA
 MN
MN
 NE
NE
 SO
SO
 MY
MY
 KK
KK
 UZ
UZ
ကီလိုဂရမ်အများအတိုင်းအတာနှင့် ထုတ်လုပ်ရေးသို့ တိုးတက်မှုရရှိရေးတွင် ဆက်လက်၍ စိန်ခေါ်မှုများ ရှိနေဆဲဖြစ်ပါသည် 3D ပရင့်ထားသော အစိတ်အပိုင်းများ၊ ပရိုတိုတိုင်းပြုလုပ်ခြင်း သို့မဟုတ် အသေးစား ထုတ်လုပ်မှုမှ ထွက်ကျော်သွားခြင်းသည် အင်ဂျင်နီယာပညာရပ်ဆိုင်ရာ စိန်ခေါ်မှုတစ်ခုဖြစ်ပါသည်။ ဖော်ပြထားသော အချက်အားလုံးသည် အခန်းကဏ္ဍမှ ပါဝင်နေသော်လည်း အကြီးစား ထည့်သွင်းထုတ်လုပ်မှုလုပ်ငန်းများ၏ အဓိကနှင့် မှီတင်းမထားသော်လည်း အရေးကြီးဆုံးလိုအပ်ချက်မှာ တည်ဆောက်မှုဧရိယာတစ်လွှား ထိန်းချုပ်မှုရှိပြီး တစ်သမတ်တည်းရရှိသော အပူချိန်ဇုန်ခွဲမှုဖြစ်ပါသည်။ အဓိကကျသောအချက်မှာ ဘေဒါကို အပူပေးခြင်းမဟုတ်ဘဲ အပူချိန်ပတ်ဝန်းကျင်ကို အင်ဂျင်နီယာပညာဖြင့် ဖန်တီးခြင်းဖြစ်ပါသည်။
အပူချိန်သည် ပို၍ အရေးကြီးသော အချက်
အပူချိန် ကွာခြားမှုများ (သို့မဟုတ်) အစိတ်အပိုင်းများတွင် အပူချိန် ကွာခြားမှုများသည် သေးငယ်သော ပုံနှိပ်မှုများတွင် ယေဘုယျအားဖြင့် သေးငယ်ပါသည်။ ပစ္စည်း၏ အအေးခံရမှုမှာ တော်တော်လေး တစ်ညီတည်းဖြစ်ပါသည်။ သို့သော် အစိတ်အပိုင်း၏ အရွယ်အစား နှင့် အများအပြား တိုးပြီးနောက်
1.အပူဓာတ်ကြီးမားမှုအား အုပ်ချုပ်ထားခြင်း- အများအားဖြင့် အပူကို စုပ်ယူ၍ အပူကို တွန်းလှန်ထားသော နည်းလမ်းများနှင့် ကွဲပြားသော နည်းလမ်းများဖြင့် အပူကို ဆုပ်ကိုင်ထားသော အများအားဖြင့် အပူကို ကွဲပြားစွာ ဆုပ်ကိုင်ထားသည်။ အထူထဲတွင် အပူကို အပူချိန်နိမ့်ကျရန် အချိန်အများကြီး လိုအပ်သည်။
2.အပူချိန်ကွာခြားမှုကို တိုးမြှင့်ခြင်း- အပူချိန်တူညီသော အပူချိန်ကို အနည်းငယ်သာ ပြသသော ပုံနှိပ်မှုများသည် အကြီးစားပုံနှိပ်မှုများတွင် အပူချိန်ကွာခြားမှုကို တိုးမြှင့်ပေးသည်။ ထိုကွာခြားမှုများသည် ပစ္စည်းအား အအေးခံရသည့်အခါတွင် အပူချိန်ကွာခြားမှုကို ဖြစ်စေသည်။
3.အတွင်းပိုင်းတွင် ဖိအားများစုဝေးခြင်း- အပူချိန်ကွာခြားမှုသည် အတွင်းပိုင်းတွင် ဖိအားများစုဝေးခြင်းကို တိုက်ရိုက်ပြသသည်။ ထိုကဲ့သို့သော ဖိအားများသည် ပုံနှိပ်ခြင်း သို့မဟုတ် အအေးခံရမှုလုပ်ငန်းစဉ်အတွင်း ပစ္စည်း၏ အားသော့ချက်အား ကျော်လွန်သွားပါက ရလဒ်မှာ ပုံစံပျက်ခြင်း၊ အလွှာများကို ခွဲထုတ်ခြင်း၊ ကွဲအက်ခြင်း သို့မဟုတ် အစိတ်အပိုင်းများကို ပြိုကွဲခြင်းဖြစ်သည်။ ပို၍ကြီးမားသော ပုံစံများသည် ဖိအားများကို ပို၍များပြားစေသည်။
၄။ ခန်းမ၏အလေးချိန်- အပူထုတ်လွှတ်မှုရှိသော အစိတ်အပိုင်းကြီးများနှင့် ကြီးမားသောတည်ဆောက်ခန်းတွင် ပတ်ဝန်းကျင်အပူချိန်ကို တစ်ပုံစံတည်းဖြစ်အောင်ထိန်းထားရန် ခက်ခဲပါသည်။ တံခါး သို့မဟုတ် လေထွက်ပေါက်များရှိ အအေးစက်နေရာများနှင့် အပူစက်နေရာများကို အပူချိန်ကိရိယာများ သို့မဟုတ် လျှပ်စစ်ပစ္စည်းများတွင် တွေ့ကြုံရတတ်ပါသည်။
အပူချိန်ဇုန်ခွဲခြင်း- ရာဇဝတ်မူအရ တည်ဆောက်ခန်းအတွင်းရှိ အပူချိန်ဇုန်များနှင့် အစိတ်အပိုင်းများကို ဖန်တီးခြင်းနှင့် ထိန်းချုပ်ခြင်း
အပူချိန်ဇုန်ခွဲခြင်းသည် တည်ဆောက်ခန်းအတွင်းနှင့် အစိတ်အပိုင်းများတွင် ရာဇဝတ်မူအရ အပူချိန်ဇုန်များကို ဖန်တီးခြင်းနှင့် ထိန်းချုပ်ခြင်းဖြစ်ပါသည်။ မည်သည့်နေရာတွင်မဆို တစ်ပုံစံတည်းဖြစ်သော အပူချိန်ကိုရရှိရန်မဟုတ်ဘဲ အကျိုးဆိုးများကို ထိန်းချုပ်နိုင်ရန် အပူချိန်ခြားနားမှုများကို စီမံခန့်ခွဲရန်ဖြစ်ပါသည်။ အရေးကြီးဆုံးရာဇဝတ်မူများမှာ-
1.များစွာသောဇုန်များတွင်ဖိတ်ခြင်း- ပိုကြီးတဲ့ဖိတ်ပြားများအတွက်ပိုကောင်းတဲ့ဇယားကွက်ဖိတ်ခြင်းကိုတိုးတက်စေပါသည်။ လုပ်ငန်းခွင်အစွန်အဖျားများတွင်အေးမြနေသည့်နေရာများ(အေးမြနေသည့်နေရာများကိုတွန်းလှန်ရန်) သို့မဟုတ်ဖိတ်ပြားပေါ်ရှိအေးမြနေသည့်နေရာများကိုတွန်းလှန်ရန်အတွက်အော်ပရေတာများကိုလည်းအနည်းငယ်သောအပိုပူပေးနိုင်စေရန်လည်းဖြစ်ပါသည်။ ဤသည်မှာပထမဆုံးအလွှာ၏ပိုကောင်းသောတစ်သမတ်တည်းဖြစ်မှုနှင့်တည်ငြိမ်မှုကိုတိုးတက်စေပါသည်။
2.ထိန်းချုပ်ထားသောဖိတ်ခန်းနှင့်ဇုန်ခွဲခြင်း- တိုးတက်သောစနစ်များတွင်ဖိတ်ခန်းတွင်တည်နေရာများစွာတွင်(နံရံများ၊ မိုးကပ်၊ တခါတရံတွင်ကမ်းပြုပုံများတွင်ပင်) ထိန်းချုပ်ထားသောဖိတ်ပေးသည့်အစိတ်အပိုင်းများစွာကိုပံ့ပိုးပေးပါသည်။ ဤသည်မှာအောက်ပါအတိုင်းဖြစ်ပါသည်-
ပတ်ဝန်းကျင်တစ်သမတ်တည်းဖြစ်မှု- အင်ဂျင်နီယာပစ္စည်းများအတွက်အရေးကြီးသောဖိတ်ခန်းအတွင်းရှိစဥ်အတိုင်းပူနေမှုကိုတွန်းလှန်ရန်သဘာဝကူးစက်မှုနှင့်ဓာတုပူပေးမှုဆုံးရှုံးမှုကိုတွန်းလှန်ပါ။
ပစ်မှတ်ဖိတ်ခြင်း- အက်ပ်ပိုင်းများတွင်ပိုမိုထူထဲသောအစိတ်အပိုင်းများကိုပိုမိုပူပေးခြင်းဖြင့်အေးမြနေသည့်အချိန်ကိုအနည်းငယ်နှောင့်နှေးစေပြီးအေးမြနေသည့်အစိတ်အပိုင်းများနှင့်အပူချိန်ကွာခြားမှုကိုလျော့နည်းစေပါသည်။
၃။ လမ်းကြောင်းသတ်မှတ်ထားသော လေထုစီမံခန့်ခွဲမှု- လေထုကို အအေးပေးခြင်းနှင့် ဆက်စပ်နေသော်လည်း အပူချိန်ဇုန်ခွဲမှုတွင် အရေးပါသော အခန်းကဏ္ဍမှ ပါဝင်ပါသည်။ နေရာများစွာတွင် တပ်ဆင်ထားသော နှုတ်ဖူးများ သို့မဟုတ် ထိန်းချုပ်နိုင်သော လေပြောင်းများသည်-
အပူစုန်များကို ကာကွယ်ခြင်း- အပူချိန်အရင်းအမြစ်များ သို့မဟုတ် အစိတ်အပိုင်းများ အုပ်စုလိုက်နေသော နေရာများတွင် အပူလေထု စုပုံမှုများကို ကာကွယ်ရန် ပျော့ပျော့ညင်ညင် လေထုကို လှည့်ပေးပါသည်။
တစ်ညီတည်းအအေးပေးခြင်းကို တွန်းလှန်ပေးခြင်း- ထုတ်ကုန်တစ်ခုကို ပြီးစီးပြီးနောက် ထိန်းချုပ်ထားသော အအေးခံရာတွင် အပူချိန်တွင် ထိန်းချုပ်နိုင်သော အအေးပေးမှုနှုန်းများကို ပိုမိုရှင်းလင်းစွာဖန်တီးရာတွင် ကူညီပေးပါသည်။
အမှတ်ရောက် အအေးပေးခြင်း (သတိဖြင့် အသုံးပြုရန်)- အလွန်သေးငယ်သော အမှတ်ရောက် အစိတ်အပိုင်းများကို အမှတ်ရောက် အအေးပေးခြင်းသည် အမြန်ခိုင်မာလိုသော အစိတ်အပိုင်းများ (ဥပမာ- အောက်ခြေကျော်လွန်သော အစိတ်အပိုင်းများ) တွင် သတိဖြင့် အသုံးပြုနိုင်ပြီး အနီးအနားရှိ အသစ်များကို ကာကွယ်ရန် လုံးဝထိန်းချုပ်ထားရမည်ဖြစ်သည်။
၄။ လုပ်ငန်းစဉ် ပါရာမီတာ ပေါင်းစည်းမှု- အပူချိန်ဇုန်ခွဲမှုသည် ဟာ့ဒ်ဝဲမဟုတ်ပါ။ ပိုင်းခြားနည်းများသည် အရေးကြီးပါသည်-
အလိုအလျောက်အဆင့်သင့်ပြောင်းလဲသော အချိန်- အကြီးစားအလွှာများတွင် အပူချိန်ကိုဆုံးရှုံးရန် အချိန်ပိုပေးရန်နှင့် အသေးစားအလွှာများတွင် အပူချိန်ကျဆင်းရန် အလိုအလျောက် နှေးကွေ့သို့မဟုတ် အမြန်ပုံနှိပ်ခြင်း။
ကိရိယာလမ်းကြောင်း စီမှု- ကိရိယာလမ်းကြောင်းစီစဉ်မှုသည် အကျုံးဝင်သော အပူချိန်တိုးတက်မှုကို အကောင်းဆုံးသော သက်ရောက်မှုရှိစေရန် အသုံးပြုပါက သက်ရောက်မှုရှိနိုင်ပါသည်။ ကပ်လျှက်ရှိသော အပိုင်းများတွင် ပုံနှိပ်ခြင်းသည် အကြိမ်ကြိမ်ကြားတွင် အပူချိန်ကျဆင်းရန် ခွင့်ပြုပေးမှာဖြစ်ပြီး တစ်စုံတစ်ခုသောဇုန်တွင် အပူချိန်စုစည်းမှုကို ရှောင်ရှားပေးမှာဖြစ်သည်။
ပစ္စည်းအချို့၏ အနုပညာ
ပစ္စည်းအမျိုးမျိုးသည် အပူချိန်ကိုက်ညီမှုကို တုံ့ပြန်မှုတူတူမဟုတ်ပါ။ ကွဲကွာသောပလပ်စတစ်များ (ဥပမာ- နိုင်လွန်များ၊ PEEK စသည်) တွင် ပုံသဏ္ဍာန်ပြောင်းလဲမှုကြောင့် အတွင်းပိုင်းအထုကျုံ့မှုများပြားပြီး အအေးပေးမှုနှုန်းအပေါ်တွင် အများအားဖြင့် မူတည်ပါသည်။ အမော်ဖပစ္စည်းများ (ABS သို့မဟုတ် PC ကဲ့သို့) သည် အထူးခြားမှုနည်းပါးသော်လည်း အပူချိန်ကွာခြားမှုကြောင့် ပုံပျက်တတ်ပါသည်။ ပုံသဏ္ဍာန်ပြောင်းလဲမှုကို အကောင်းဆုံးဖြစ်အောင် အပူချိန်ကိုက်ညီမှုအတွက် ပစ္စည်းကို ပုံသဏ္ဍာန်ပြောင်းလဲရန် အပူချိန်ကိုက်ညီမှုနှင့် ပုံသဏ္ဍာန်ပြောင်းလဲမှုအပေါ် အခြေခံ၍ ဇုန်ခွဲမှုကို ပိုမိုသတ်မှတ်သင့်ပါသည်။
အကျိုးအမြတ်- စုံလင်မှုနှင့် အရည်အသွေးကို အကြီးအကျယ်ရရှိခြင်း
ကီလိုဂရမ်အများအပြားကို တိကျသောအပူချိန်ဖြင့် ထုတ်လုပ်နိုင်သော စွမ်းရည်သည် တိုးတက်မှုတစ်ခုထက်ပို၍ များသောအားဖြင့် အမှားကင်းသော အောင်မြင်မှုကို ရရှိနိုင်သော လမ်းကြောင်းတစ်ခုဖြစ်ပါသည်။ အကျိုးကျေးဇူးများစွာရှိပါသည်-
ပုံပျက်ခြင်းနှင့် ကွဲခြားမှုကို အလွန်အမင်းလျော့နည်းစေခြင်း- အတွင်းပိုင်းဖိအားကို နိမ့်ပါးစေခြင်းဖြင့် ဖိုင်ဘာအတိုင်းအတာနှင့် ဖွဲ့စည်းပုံအပြည့်အဝကို ထိန်းသိမ်းထားပါသည်။
အလွှာအကူးအပြောင်းကောင်းမွန်ခြင်း- တူညီသောအပူချိန်ဖြင့် အလွှာများကြား ကပ်လျက်ရှိမှုအကောင်းဆုံးဖြစ်ပါသည်။
မျက်နှာပြင်အရည်အသွေး မြှင့်တင်ခြင်း- မျက်နှာပြင်တစ်ခုလုံးတွင် တည်ငြိမ်မှု မြှင့်တင်ပေးခြင်းသည် အဆင်မပြေများကဲ့သို့သော မျက်နှာပြင်အပ်ပျက်စီးမှုများကို လျော့နည်းစေပါသည်။
ပထမအလွှာအောင်မြင်မှုနှင့် ပလိတ်ကပ်ရှိမှုကို တိုးစေခြင်း- ဇုန်ထိန်းချုပ်ထားသော တည်ဆောက်မျက်နှာပြင်များသည် ကျယ်ပြန့်သောဧရိယာများတွင် အောင်မြင်စွာတည်ဆောက်နိုင်စေပါသည်။
ပစ္စည်းဂုဏ်သတ္တိများ တည်ငြိမ်မှုကို တိုးစေခြင်း- အပိုင်းအစအတွင်းရှိ စက်များ၏ မျှတသောဂုဏ်သတ္တိများကို ထိန်းချုပ်ထားသောကြောင့် ပိုမိုခန့်မှန်းနိုင်သော စက်ဂုဏ်သတ္တိများကို ရရှိနိုင်ပါသည်။
ထုတ်လုပ်မှုပိုများလာခြင်းနှင့် အမှိုက်ပိုနည်းခြင်း- ပျက်ပြားသော ပုံနှိပ်မှုများကို လျော့နည်းစေခြင်းသည် ပစ္စည်းအသုံးပြုမှုနှင့် ပိုင်းပြားထုတ်လုပ်ရာတွင် စရိတ်ကို အကျိုးသက်ရောက်စေပါသည်။
စွမ်းအင်ထိရောက်မှု အလားအလာ- လိုအပ်သောဧရိယာကိုသာ အပူပေးသည့်လုပ်ငန်းစဉ်သည် အလွန်ကျယ်ပြန့်သော အခန်းကို အပူပေးခြင်းထက် စွမ်းအင်ကို ပိုမိုထိရောက်စွာ အသုံးပြုနိုင်ပါသည်။
အဆုံးသတ်
အသေးစိတ်နှင့် အလေးချိန်နုတ်နိမ့်သော အမှန်အတိုက်အတွက် အထူးသဖြင့် ဖွဲ့စည်းမှုအရ အရေးကြီးမဟုတ်သော အစိတ်အပိုင်းများကို ကျော်လွန်၍ အမှန်ထည့်သွင်းထုတ်လုပ်မှုသည် အပူပတ်ဝန်းကျင်ကို ထိန်းချုပ်မှုရယူခြင်းသည် အရေးကြီးလာပါသည်။ မီလီဂရမ်အများအပြားကို ထည့်သွင်း၍ ပုံနှိပ်ထုတ်လုပ်မှုတွင် တွေ့ကြုံရသော အပူပိုင်းဆိုင်ရာ စိုးရိမ်မှုများကို ကိုင်တွယ်ရာတွင် အပူချိန်ဇုန်ခွဲခြင်း သို့မဟုတ် တည်ဆောက်မှုအတွင်း အပူချိန်ကို တိကျစွာဖြန့်ဖြူးပေးခြင်းသည် သော့ချက်ဖြစ်ပါသည်။ အဆင့်မြင့် 3D ပုံနှိပ်ခြင်းကို အန္တရာယ်များသော နယ်ပယ်မှ မှီခိုစွာထုတ်လုပ်နိုင်သော လုပ်ငန်းစဉ်သို့ ပြောင်းလဲပေးပြီး စိတ်ဖိစီးမှုအနည်းငယ်ဖြင့် အရည်အသွေးမြင့် အစိတ်အပိုင်းများကို ထောက်ပံ့ပေးနိုင်ပါသည်။ အလွယ်တကူ မပျက်ကွက်စေရန်သာ မဟုတ်ဘဲ စက်မှုလုပ်ငန်းအဆင့် အမှန်ထည့်သွင်းထုတ်လုပ်မှု၏ တန်ဖိုးကို ဖော်ထုတ်ရန် အပူပတ်ဝန်းကျင်ကို စုစည်း၍ စီမံခန့်ခွဲရန် လိုအပ်ပါသည်။